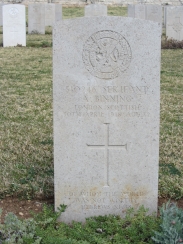
| First Name: | Alan | Last Name: | BINNING | |
|---|---|---|---|---|
| Date of Death: | 30/04/1918 | Lived/Born In: | Blackheath | |
| Rank: | Sergeant | Unit: | London2/14 | |
| Memorial Site: | ||||
Current Information:Age-32 101, Shooters Hill Road, Blackheath Jerusalem War Cemetery
After the Western Front, the second largest theatre of war between 1914 and 1918 was Egypt and Palestine. Britain had long had a foothold in Egypt guarding the vitally important Suez Canal and when war was declared against Turkey (the Ottoman Empire) who controlled all of what is now known as the Middle East, British troops were sent to guard the canal from attacks from the north. For the first two years of the war the British forces were on the defensive as the Turks, backed by the Germans, made a number of attempts against the canal but an important victory in August 1916 at Rumani relieved the pressure and the British force was then able to move onto the offensive and advance north into Palestine. It took them three attempts to break through the Gaza-Beersheba line which was finally achieved at the end of October 1917 followed shortly after by the capture of Jerusalem. In February 1918, the British Army extended their right towards the Jordan Valley as a result of which Jericho was occupied. The plan now was to launch large scale raids across the River Jordan and strike at the Hedjaz railway, a vital supply line for the enemy. The first of these raids took place between 22nd - 30th March and was carried out by the 60th (2/2nd London) Division and the Australian and New Zealand Mounted Divisions but in the face of strong Turkish opposition it failed to achieve its objectives and the force withdrew back to the River Jordan. A second attempt, equally unsuccessful, was made by 60th Division at the end of April. On 29th April they concentrated in the bridgehead across the Jordan, 180 Brigade to the south of the Wadi Mimrin and 179 Brigade to the north of it, ready for an advance the following day. On 30th April the first objective for 180 Brigade was from Ma’qqer ed Derbasi to Tell Buleibil, two hills rising from the plain south and north respectively of the Wadi Nimrin while 179 Brigade headed for the dominating height of El Haud. The leading battalions moved off at 2.15am and by 3am, 2/19th London of 180 Brigade had reached Ma’qqer ed Derbasi. Here they made three efforts before dawn to reach the summit by the only approaches, two narrow paths, but met by heavy machine-gun fire they were knocked back each time. On one occasion, two officers and a small party of men got to the top but there they were counter attacked and only one officer, severely wounded, made it back. There was better luck for 2/20th London north of the wadi. They met only a little opposition until they reached the first crest where they cleared a line of trenches with the bayonet. They were then temporarily checked by a Turkish counter attack but the reserve company routed this. The advance resumed but they now faced flanking machine-gun fire particularly from Ma’qqer ed Derbasi and a slight withdrawal was forced upon them by a single enemy mountain gun firing at point blank range. The attack was postponed until the next day. That afternoon 2/19th London was replaced by 2/17th London and 2/20th London by 2/18th London with the relieved battalions remaining in close support. On 179 Brigade’s front, 2/14th London attacked the heights of El Haud, while 2/16th London moved towards the high ground north of the hill with 2/13th London following a 1000 yards in the rear. 2/14th London fought its way 500 yards up the slope despite determined resistance, capturing 73 prisoners and their machine-guns. Here they came under fire from from a spur on their left but a swift attack by 2/16th London took this position. At this stage progress then came to an end. Communications with the artillery was extremely difficult and there was a shortage of small arms ammunition and as with 180 Brigade the attack here was postponed. A second attempt was made by on 1st May but this too failed. At 5.30am, after a 75 minute bombardment the attack was launched with the objectives the same as the previous day. The scrub, which did not extend to the foot of the hills, gave cover for an approach but then served as an aiming mark for the Turks. Machine-gun fire was concentrated on its edge and effort after effort to cross the open ground failed. A rush by a company of 2/18th London, attacking Tell Buleibil, captured two Turkish redoubts and a few prisoners but that was the only success. A cavalry counter attack soon forced them back. Once again the operation was called off and 60th Division fell back to their original positions to regroup and lick their wounds. One of those who did not survive this encounter with the enemy was Alan Binning of 2/14th London. |
||||
| « Back to Search Results | ||||
| If you think any of the information shown here is incorrect, Click Here to submit your amends and comments | ||||


